


In this post, we will cover the step-by-step guide to getting started with Flutter. Flutter has been emerging as a great option for developing cross-platform mobile apps since Google announced the first stable version at Flutter Live. But where to start?
What is Flutter
Simply put, Flutter is a framework which allows developers to create cross-platform apps using a single programming language. Flutter can be considered an alternative to the React Native framework. The Flutter framework is being developed at Google but it’s open to all external contributors. Flutter has been around for a long time, but it started getting more attention when Google announced the release preview of Flutter. At Flutter Live on 4 December 2018, with loads of new features. After this, the popularity of Flutter apps grew drastically.
Flutter uses the Dart programming language which was introduced by Google in 2011 and is rarely used by developers. Dart syntax is easy to understand as it supports most of the object-oriented concepts. Flutter apps are a collection of widgets, everything in the Flutter is a widget. Basically, this information is enough for anyone to get their hands dirty with Flutter. To learn more about the technical details of Flutter, refer to the technical overview in the official cookbook.
Installing Software
In order to get started with Flutter, we have to install some software on your local machine. You can either use macOS, Windows or Linux to get started with Flutter, however, macOS has the benefit of getting both the iOS and Android environment on the same machine. We will assume that you are using macOS for Flutter development, but you can always follow the similar instructions for Windows and Linux as well.
Install Flutter
Flutter installation needs some command line tools installed on macOS. Most of the tools come with Xcode. You can download Flutter SDK either from Github or the official download page. Once we have the Flutter SDK, we have to add it into the PATH so that we can access Flutter binary globally. The first step is to download Flutter SDK and unzip it to a suitable location on our disk. We can do this by using the following command:
$ cd ~/development
$ unzip ~/Downloads/flutter_macos_v1.5.4-hotfix.2-stable.zip

$ unzip flutter_macos_v0.7.3-beta.zip
Now that we have downloaded the Flutter SDK, we need to add Flutter to our $PATH so that we can access Flutter globally. This varies from shell to shell, bash, we can simply run this command:
$ export PATH=[PATH_TO_FLUTTER__DIRECTORY]/flutter/bin:$PATHYou can find the instructions to update the Flutter PATH here. Once you set up the PATH, you should then be able to confirm installation by running:
$ flutter --helpThis command will print all available commands of Flutter.
Install Xcode
You can develop both iOS and Android apps with Flutter. If you are developing an iOS app with Flutter, you need to install Xcode on your macOS. You can not install on other platforms like Windows or Linux. On macOS, it’s very easy to install Xcode, you simply need to use your Apple developer account and download it from the App Store. Xcode is a large piece of software so it will take some time to download. Once you have Xcode installed, you will get most of the command line tools along with Xcode. We might need to configure the Xcode command line tools to use the newly-installed version of Xcode by using the command:
$ sudo xcode-select --switch /Applications/Xcode.app/Contents/DeveloperOnce the command line tools install, you need to agree on the Xcode terms and conditions. You can do so by opening Xcode and clicking on the Agree button or by confirming or running sudo xcodebuild - license from the command line.
With Xcode, you’ll be able to run Flutter apps on an iOS device or on the simulator. The complete guide for the iOS setup is available in the Flutter documentation, here.
Install Android SDK Studio
If you are developing apps for Android, you also need to complete Android setup. If you download and install Android Studio then most of the basic setup is covered. Once you start Android Studio, go through the ‘Android Studio Setup Wizard’. This installs the latest Android SDK, Android SDK Platform-Tools and Android SDK Build-Tools, which are required by Flutter when developing for Android. You can also set up a device or emulator for the Android development as mentioned in the Flutter documentation, here.
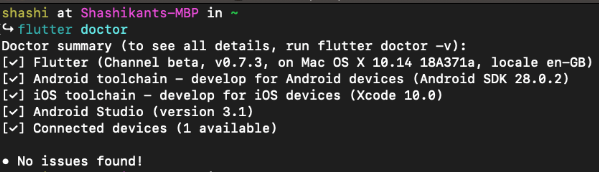
Use Flutter Doctor
Flutter comes up with an awesome command line utility to check if your machine is set up for local development. Flutter has Flutter Doctor command which guides developers through setting up the local development environment for both iOS and Android. Flutter Doctor inspects which tools are installed on the local machine and which tools need to be configured. Once the Flutter Doctor command is happy, we can carry on creating a new Flutter app.
Setting up Editors
Flutter development can be done on any editor or IDE of your choice. The getting started guide for Flutter contains detailed information on IDE setup for Android Studio, IntelliJ and Visual Studio Code. However, you can use lightweight editors like Sublime Text for Flutter development as well. The choice of editor/IDE is completely up to the developer. Once we have finished the setup for our favourite editor, we can start developing Flutter apps.
Know Pub Package Manager
Flutter uses the Pub Package Manager to manage the Dart packages inside the Flutter project. You will find the pubspec.yaml file in the Flutter project which imports Dart dependencies inside the Flutter project. You can mention all the dependencies in the file and install using the command:
$ flutter packages getThis will install all the dependencies and create a locked version of the file, which is pubspec.lock, so that we will always lock dependencies. We can upgrade the dependencies using the command:
$ flutter package upgradeThis will upgrade all packages to the latest version, or you can update individual packages.
It’s good to know the concept of Pub Package Manager well in advance in order to understand the Flutter project better.
Write Your First Flutter App
At this point, you will be able to start developing your first Flutter app. There are multiple ways to create a template app, such as using the command line, using Android Studio or using IntelliJ. However, we will use the command line way in order to understand the entire Flutter project. Flutter can generate a boilerplate for the sample app by running the following commands:
$ flutter create name_of_your_appYou can give any name to your app e.g flutter_testing or hello_world. Let’s say “flutter_test” for now.
$ flutter create flutter_testThis command will create the boilerplate of the Flutter app inside the flutter_test directory. You can run your first ever Flutter app using the commands. However, you need to have a device/simulator running to see the app.
$ cd flutter_test

$ flutter run
You can see the app running in the emulator/simulator or devices. This would be the default Flutter app which counts how many times you pressed the + button. The app looks like this in the simulator:
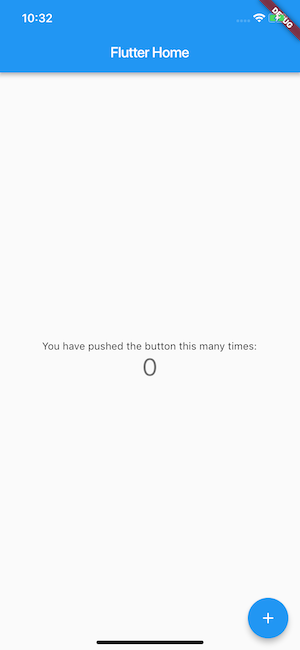
Congratulations! You have successfully run your first Flutter app in the simulator.
Understand the Directory Structure
Now that we have Flutter app up and running, it’s very important to understand the directory structure of the Flutter app. At the moment, we see the directory structure as follows:
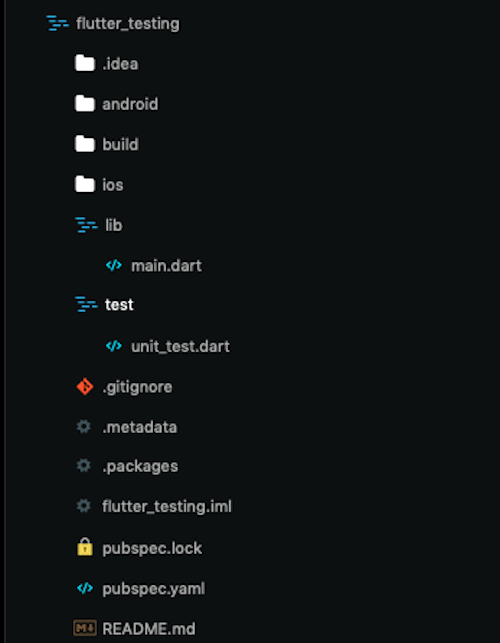
We have a dedicated directory for the iOS and Android app. Some configuration files like pubspec.yaml, .gitignore, etc are there at the root of the project. We have two main directories where most of our Flutter code will live, i.e. lib and test. In the “lib” directory we have main.dart where our app code lives, and we can write the tests in the “test” directory. In the main.dart file, you can create widgets and develop Flutter apps as per your needs. You can refer to the great documentation of Flutter.
Write Your First Test
As you develop the Flutter app, it’s great practice to test the app with a solid set of automated tests. Flutter has a richer set of testing features than any other cross-platform mobile app development framework. Flutter provides a solid testing framework which allows developers to write tests at the unit, functional and UI level. Widget testing is one cool feature that Flutter provides to run UI tests as fast as unit tests. Flutter also has UI tests, known as integration tests, that run on the simulator or on real devices. Flutter has great documentation on how to test Flutter apps at different levels. You can read our post on Full Stack testing of the Flutter apps to gain a practical insight on Flutter testing.
Now let’s add Widget tests for the demo app, which check the initial state of the app, tap the + button and assert that the state has been and counter incremented. The test will look something like this.
import 'package:flutter/material.dart';
import 'package:flutter_test/flutter_test.dart';
import 'package:flutter_testing/main.dart';
void main() {
testWidgets('Counter increments smoke test', (WidgetTester tester) async {
// Build our app and trigger a frame.
await tester.pumpWidget(MyApp());
// Verify that our counter starts at 0.
expect(find.text('0'), findsOneWidget);
expect(find.text('1'), findsNothing);
// Tap the '+' icon and trigger a frame.
await tester.tap(find.byIcon(Icons.add));
await tester.pump();
// Verify that our counter has incremented.
expect(find.text('0'), findsNothing);
expect(find.text('1'), findsOneWidget);
});
}
Let’s name this test widget_test.dart and keep it inside the test directory. We can run the test from the command line using the flutter test command which will execute all tests from the test directory. However, we can execute a single test using the command
$ flutter test test/widget_test.dartThis command will execute the widget test only.
Conclusion
Flutter is booming as a cross-platform mobile application development framework, and developers are keen to get started with Flutter. We hope this guide acts a great kick-off point for your first Flutter project.