Online Food Delivery Mobile App Design.
Through a wide variety of mobile applications.
- Client Rainbow IT LTD
- Date 25 June 2020
- Services Video Production
- Thanks Rafekul, Nipa Bali
I'm a Full-Stack developer. I've designed, developed and tested many web and mobile applications. I write clean, responsive, reusable code and always hit my deadlines on time.

We'll plan and arrange your content on a website so that it can be shared online with the world.
We'll handle everything from to app development process until it is time to make your project live.
Using our expertise in mobile application development to create beautiful pixel-perfect designs.
We’ll help you optimize your business processes to maximize profitability and eliminate unnecessary costs.
Your website ranking matters. Our SEO services will help you get to the top of the ranks and stay there!
A UX consultant is responsible for many of the same tasks as a UX designer, but they typically.
Through a wide variety of mobile applications.

UI/UX Design, Art Direction, A design is a plan or specification for art viverra maecenas accumsan.

Through a wide variety of mobile applications, we’ve developed a unique visual system and strategy that can be applied across the spectrum of available applications.
Most recent Debt/Equity Ratio greater than the median industry average: High debt/equity ratio implies high leverage. High leverage indicates a huge level of repayment that the company has to make in connection with the debt amount.

Through a wide variety of mobile applications, we’ve developed a unique visual system and strategy that can be applied across the spectrum of available applications.
A strategy is a general plan to achieve one or more long-term.
UI/UX Design, Art Direction, A design is a plan or specification for art.
Lorem ipsum dolor sit amet, consectetur adipiscing elit, sed do eiusmod tempor incididunt ut labore et dolore magna aliqua. Quis ipsum suspendisse ultrices gravida. Risus commod viverra maecenas accumsan lacus vel facilisis. ut labore et dolore magna aliqua.


There are always some stocks, which illusively scale lofty heights in a given time period. However, the good show doesn’t last for these overblown toxic stocks as their current price is not justified by their fundamental strength.
Toxic companies are usually characterized by huge debt loads and are vulnerable to external shocks. Accurately identifying such bloated stocks and getting rid of them at the right time can protect your portfolio.
Overpricing of these toxic stocks can be attributed to either an irrational enthusiasm surrounding them or some serious fundamental drawbacks. If you own such bubble stocks for an inordinate period of time, you are bound to see a massive erosion of wealth.
However, if you can precisely spot such toxic stocks, you may gain by resorting to an investing strategy called short selling. This strategy allows one to sell a stock first and then buy it when the price falls.
While short selling excels in bear markets, it typically loses money in bull markets.
So, just like identifying stocks with growth potential, pinpointing toxic stocks and offloading them at the right time is crucial to guard one’s portfolio from big losses or make profits by short selling them. Heska Corporation HSKA, Tandem Diabetes Care, Inc. TNDM, Credit Suisse Group CS,Zalando SE ZLNDY and Las Vegas Sands LVS are a few such toxic stocks.Screening Criteria
Here is a winning strategy that will help you to identify overhyped toxic stocks:

Most recent Debt/Equity Ratio greater than the median industry average: High debt/equity ratio implies high leverage. High leverage indicates a huge level of repayment that the company has to make in connection with the debt amount.
Through a wide variety of mobile applications, we’ve developed a unique visual system and strategy that can be applied across the spectrum of available applications.
A strategy is a general plan to achieve one or more long-term.
UI/UX Design, Art Direction, A design is a plan or specification for art.
Lorem ipsum dolor sit amet, consectetur adipiscing elit, sed do eiusmod tempor incididunt ut labore et dolore magna aliqua. Quis ipsum suspendisse ultrices gravida. Risus commod viverra maecenas accumsan lacus vel facilisis. ut labore et dolore magna aliqua.
There are always some stocks, which illusively scale lofty heights in a given time period. However, the good show doesn’t last for these overblown toxic stocks as their current price is not justified by their fundamental strength.
Toxic companies are usually characterized by huge debt loads and are vulnerable to external shocks. Accurately identifying such bloated stocks and getting rid of them at the right time can protect your portfolio.


Overpricing of these toxic stocks can be attributed to either an irrational enthusiasm surrounding them or some serious fundamental drawbacks. If you own such bubble stocks for an inordinate period of time, you are bound to see a massive erosion of wealth.
However, if you can precisely spot such toxic stocks, you may gain by resorting to an investing strategy called short selling. This strategy allows one to sell a stock first and then buy it when the price falls.
While short selling excels in bear markets, it typically loses money in bull markets.
So, just like identifying stocks with growth potential, pinpointing toxic stocks and offloading them at the right time is crucial to guard one’s portfolio from big losses or make profits by short selling them. Heska Corporation HSKA, Tandem Diabetes Care, Inc. TNDM, Credit Suisse Group CS,Zalando SE ZLNDY and Las Vegas Sands LVS are a few such toxic stocks.Screening Criteria
Here is a winning strategy that will help you to identify overhyped toxic stocks:

Most recent Debt/Equity Ratio greater than the median industry average: High debt/equity ratio implies high leverage. High leverage indicates a huge level of repayment that the company has to make in connection with the debt amount.

Through a wide variety of mobile applications, we’ve developed a unique visual system and strategy that can be applied across the spectrum of available applications.
A strategy is a general plan to achieve one or more long-term.
UI/UX Design, Art Direction, A design is a plan or specification for art.
Lorem ipsum dolor sit amet, consectetur adipiscing elit, sed do eiusmod tempor incididunt ut labore et dolore magna aliqua. Quis ipsum suspendisse ultrices gravida. Risus commod viverra maecenas accumsan lacus vel facilisis. ut labore et dolore magna aliqua.
There are always some stocks, which illusively scale lofty heights in a given time period. However, the good show doesn’t last for these overblown toxic stocks as their current price is not justified by their fundamental strength.
Toxic companies are usually characterized by huge debt loads and are vulnerable to external shocks. Accurately identifying such bloated stocks and getting rid of them at the right time can protect your portfolio.


Overpricing of these toxic stocks can be attributed to either an irrational enthusiasm surrounding them or some serious fundamental drawbacks. If you own such bubble stocks for an inordinate period of time, you are bound to see a massive erosion of wealth.
However, if you can precisely spot such toxic stocks, you may gain by resorting to an investing strategy called short selling. This strategy allows one to sell a stock first and then buy it when the price falls.
While short selling excels in bear markets, it typically loses money in bull markets.
So, just like identifying stocks with growth potential, pinpointing toxic stocks and offloading them at the right time is crucial to guard one’s portfolio from big losses or make profits by short selling them. Heska Corporation HSKA, Tandem Diabetes Care, Inc. TNDM, Credit Suisse Group CS,Zalando SE ZLNDY and Las Vegas Sands LVS are a few such toxic stocks.Screening Criteria
Here is a winning strategy that will help you to identify overhyped toxic stocks:

Most recent Debt/Equity Ratio greater than the median industry average: High debt/equity ratio implies high leverage. High leverage indicates a huge level of repayment that the company has to make in connection with the debt amount.
This degree provided me a wide range of career options after MCA include specialized profiles in software development.
The objective of this degree is to provide us the required skills to get rewarding careers into the world of Information Technology.
Secondary education or post-primary education covers two phases on the International Standard Classification of Education scale.
A full-stack developer is a web developer or engineer who works with both the front and back ends of a website or application.
Key responsibilities include product roadmap execution, hands-on approach to all aspects of Software Development Lifecycle.
Full-Stack web development using PHP and JavaScript technologies like Node.js, React.js, Laravel, CodeIgniter, MongoDB and MySql.

One of the best developers i've met. super fast, reliable and someone you can always count on. have huge knowledge and experience. Totally recommend him if you want to get your job done

he is a great developer - have skills frontend backend even we go with technologies like laravel and vue.js and we are still on work
Introduction Node.js applications often become difficult to maintain as they grow in size and complexity. As new features are added,

Node.js applications often become difficult to maintain as they grow in size and complexity. As new features are added, the codebase can become disorganized and difficult to manage.
Nest.js offers a solution to this problem by providing a framework for building efficient and scalable server-side applications. It offers a modular structure for organizing code and was built using TypeScript and Express.js, making it compatible with many Express middleware.
With Nest.js, you can create clean and organized code that is easy to maintain. In this tutorial, we’ll be creating a small RESTful API for a bookstore, allowing users to fetch, create and delete books.
Before starting this tutorial, there are a few prerequisites that need to be in place. You will need a local development environment for Node.js.
The following are the building blocks used when building Nest.js applications:
Controllers are a crucial component in Nest.js, as they handle incoming requests and generate responses for the client side of the application. In the context of a RESTful API, for example, if a request is made to the endpoint ‘/home’, the designated controller will receive this request and return the appropriate response based on the available resources.
Nest.js has a flexible routing mechanism that allows developers to control which controller will handle each request. This helps to ensure that requests are properly handled and that the right information is returned to the client. To define a controller in Nest.js, a TypeScript file is created and decorated with the @Controller() decorator.
To define a controller in Nest.js, create a TypeScript file and include a decorator @Controller() as shown in the following code snippet:
import { Controller, Get } from '@nestjs/common';

@Controller('users')
export class UsersController {
 @Get()
 findAll() {
   return 'This will return all the users';
 }
}
The prefix of users within the Controller decorator will prompt the UsersController to handle any /users GET request within an application and return the appropriate response as specified. Other HTTP request handled by the controller includes POST , PUT, DELETE as we will see later in the tutorial.
Once a controller is created, it needs to be added to the module definition before Nest.js can easily recognise it. This could be the root ApplicationModule or any other module created within the application. More about this in the module section of this post.
Now let’s look at providers.
As mentioned earlier, Nest.js was heavily inspired by Angular and similar to an Angular application, you can create a provider and inject it into controllers or other providers. These providers are also called services, and they’re designed to abstract any form of complexity and logic.
A service provider in Nest.js is a JavaScript class with a special @Injectable() decorator at the top. For example, you can create a service to fetch users:
import { Injectable } from '@nestjs/common';
import { User } from './interfaces/user.interface';

@Injectable()
export class UsersService {
  private readonly users: User[] = [];

  create(user: User) {
    this.users.push(user);   }

  findAll(): User[] {
    return this.users;
  }
}
The provider created above is a class with two methods create() and findAll(), which can be used to create and return all users respectively. And to easily help with type checking an interface was used to specify the type of elements that should be received by the methods.
Finally, let’s look at Modules. Modules let you group related files. They are Typescript files decorated with @Module decorator. This attached decorator provides metadata that Nest makes use of to organize the application structure.
Each Nest.js application must have at least one module, usually referred to as the root module. This root module is the top-level module and usually enough for a small application. It is advisable to break a large application into multiple modules as it helps to maintain the structure of the application.
If you have an application that manages a lot of data or functionality about users , you can group the controller, services, and other related files into a single module, like UsersModule:
import { Module } from '@nestjs/common';
import { UsersController } from './users.controller.ts';
import { UsersService } from './users.service.ts';

@Module({
  controllers: [UsersController],
  providers: [UsersService]
})

export class UsersModule {}
In this example, we are exported a UsersModule that contains both the UsersController and UsersService. With this in place, we can then proceed to import and use the UsersModule within the root module of the application as shown in the following code snippet:
...
import { UsersModule } from './users/users.module';

@Module({
  ...
})

export class AppModule { }
There are a few other important concepts in Nest.js:
With this pattern, it is very easy to manage dependencies between building blocks like controllers, providers and modules. The only thing required is to define the dependency for example a UsersService() in the constructor of a controller as shown here:
...
@Controller('users')
export class UsersController {
constructor(private readonly usersService: UsersService){}
 ...
}
With some of these concepts briefly covered, you can now proceed to the next section, where you will put all the knowledge gained so far in this post into use as you will learn how to seamlessly build a RESTful API using Nest.js.
As stated earlier in this post, you will create a sample application that will help you get a good grasp on some of the core concepts of Nest.js.
This application will be specifically for a bookstore. At the end of the post you would have created a micro-service that will enable users to create and add a new book with few descriptions to an existing list of books.
This could be from a database, but to ensure simplicity in this post, we won’t really be connecting our application to a database yet. But instead, we will make use of a mock data of books and once a new book is created, we will push and add it to the list.
In order to scaffold a new Nest.js application, you will need to globally install the Nest CLI application. It is a command-line tool specifically created to craft a new Nest.js app and provide access to several commands to generate different files and produce a well-structured application.
Apart from using the CLI tool, you can also install a new Nest.js application by cloning the starter project from GitHub using Git, but for the purpose of this tutorial run the following command to install the Nest CLI:
npm install -g @nestjs/cli
This will give you access to the nest command for project installation and other project specific commands.
Next, run the following command to install a new project named bookstore-nest within your development folder:
nest new bookstore-nest
You will be asked a few questions during the installation, just follow the prompt and respond accordingly. Next, once the installation is complete, switch your working directory into the newly created project:
cd bookstore-nest
Start the application with:
npm run start
You can also run the followingcommand in order to use Nodemon for the project:
// start the application using nodemon
npm run start:dev
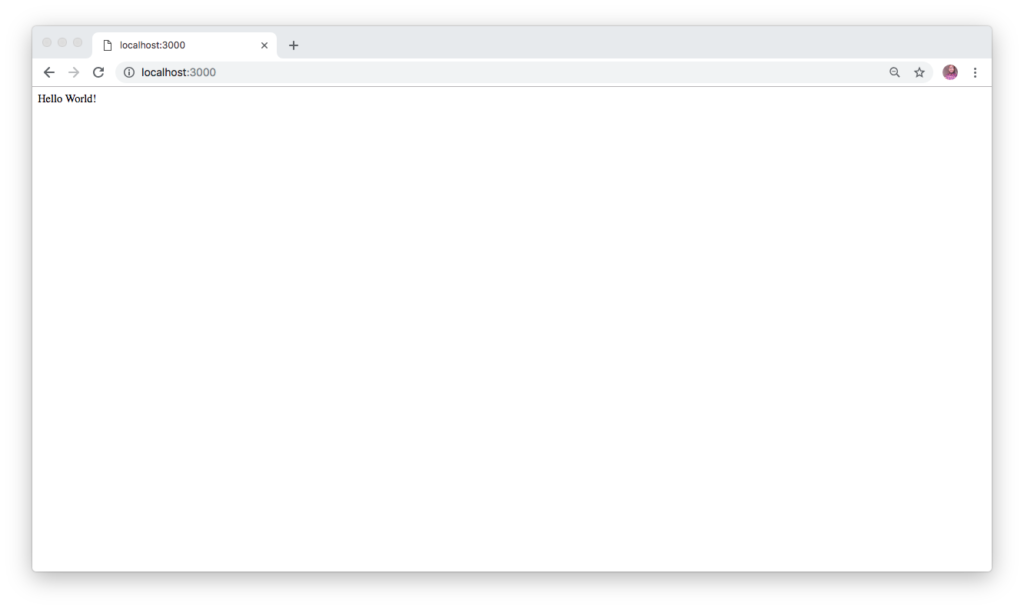
Navigate to http://localhost:3000 in your browser and you will see the Hello World! message as shown in the following image:
With the project started, let’s create the root module.
Let’s generate a module for the bookstore. To do this, you will leverage the Nest CLI’s file generator. Run the following command to scaffold a new module for the application:
nest generate module books
This creates a new folder named books within the src folder. Within the books folder you will find a books.module.ts file:
import { Module } from '@nestjs/common';
@Module({})
export class BooksModule {}
This was generated by the command and the module has also been added to the app.module.ts which happens to be the root module of the application.
Next, you will create routes for the endpoints
As mentioned earlier, routes exist in controllers, so you need to create controllers that will handle individual endpoints. Again, use Nest CLI to generate your controllers, run the following command:
nest generate controller books
This creates a controller inside the books folder. Since we won’t be connecting to the database for now, create a sample mock data for the bookstore. Under the src folder, create a subfolder named mocks and within the newly created folder, create a new TypeScript file named books.mock.ts and add the following code in it:
export const BOOKS = [
    { id: 1, title: 'First book', description: "This is the description for the first book", author: 'Olususi Oluyemi' },
    { id: 2, title: 'Second book', description: "This is the description for the second book", author: 'John Barry' },
    { id: 3, title: 'Third book', description: "This is the description for the third book", author: 'Clement Wilfred' },
    { id: 4, title: 'Fourth book', description: "This is the description for the fourth book", author: 'Christian nwamba' },
    { id: 5, title: 'Fifth book', description: "This is the description for the fifth book", author: 'Chris anderson' },
    { id: 6, title: 'Sixth book', description: "This is the description for the sixth book", author: 'Olususi Oluyemi' },
];
Next, you will create a service to hold all the logic for the bookstore.
Run the following command to generate a service:
nest generate service books
This command will create a new file named books.service.ts within ./src/books folder.
Next, open the newly created file and paste the following:
  import { Injectable, HttpException } from '@nestjs/common';
  import { BOOKS } from '../mocks/books.mock';

  @Injectable()
  export class BooksService {
      books = BOOKS;

      getBooks(): Promise<any> {
          return new Promise(resolve => {
              resolve(this.books);
          });
      }
      getBook(bookID): Promise<any> {
          let id = Number(bookID);
          return new Promise(resolve => {
              const book = this.books.find(book => book.id === id);
              if (!book) {
                  throw new HttpException('Book does not exist!', 404);
              }
              resolve(book);
          });
      }
  }
First, you imported the requires modules from Nest.js and also BOOKS from the mock data you created earlier.
Next, you created two different methods named getBooks() and getBook() to retrieve the list of books from the mock data and to fetch just one book using the bookID as a parameter.
Next, add the following method to the /src/books/books.service.ts immediately after the getBook() method:
import { Injectable, HttpException } from '@nestjs/common';
import { BOOKS } from '../mocks/books.mock';
@Injectable()
export class BooksService {
    books = BOOKS;
    ...
    addBook(book): Promise<any> {
        return new Promise(resolve => {
            this.books.push(book);
            resolve(this.books);
        });
    }
}
The method above will be used to push a new book to the existing list
Finally, add the last method to delete a particular book using the bookID as a parameter:
import { Injectable, HttpException } from '@nestjs/common';
import { BOOKS } from '../mocks/books.mock';
@Injectable()
export class BooksService {
    books = BOOKS;
    ...
    deleteBook(bookID): Promise<any> {
        let id = Number(bookID);
        return new Promise(resolve => {
            let index = this.books.findIndex(book => book.id === id);
            if (index === -1) {
                throw new HttpException('Book does not exist!', 404);
            }
            this.books.splice(1, index);
            resolve(this.books);
        });
    }
}
Here, you will use dependency injection design pattern to pass the BooksService into the BooksController through a constructor. Open the BooksController created earlier and paste the following code in it:
import { Controller, Get, Param, Post, Body, Query, Delete } from '@nestjs/common';
import { BooksService } from './books.service';
import { CreateBookDTO } from './dto/create-book.dto';

@Controller('books')
export class BooksController {
    constructor(private booksService: BooksService) { }

    @Get()
    async getBooks() {
        const books = await this.booksService.getBooks();
        return books;
    }

    @Get(':bookID')
    async getBook(@Param('bookID') bookID) {
        const book = await this.booksService.getBook(bookID);
        return book;
    }

    @Post()
    async addBook(@Body() createBookDTO: CreateBookDTO) {
        const book = await this.booksService.addBook(createBookDTO);
        return book;
    }

    @Delete()
    async deleteBook(@Query() query) {
        const books = await this.booksService.deleteBook(query.bookID);
        return books;
    }
}
First, the important modules were imported from @nestjs/common and you also import both the BooksService and CreateBookDTO respectively. CreateBookDTO is a data transfer object, a TypeScript class created for type-checking and to define the structures of what an object looks like when creating a new book. We will create this DTO in a bit.
Next, you used constructor to inject the BooksService into the controller and created four different methods which are:
getBooks(): Used to fetch the list of all books. It has @Get() decorator attached to it. This helps to map any GET request sent to /books to this controller.getBook(): Used to retrieve the details of a particular book by passing the bookID as a parameter.addBook(): Used to create and post a new book to the existing book list. And because we are not persisting into the database, the newly added book will only be held in memory.deleteBook(): Used to delete a book by passing the bookID as a query parameter.Each of the methods has a special decorator attached to it, which makes it very easy to route each HTTP request to a specific method within the controller.
In the previous section, you made use of a data transfer object called CreateBookDTO. To create it, navigate to the ./src/books folder and create a new subfolder name dto. Next, within the newly created folder, create another file and call it create-book.dto.ts and paste the following in it:
export class CreateBookDTO {
    readonly id: number;
    readonly title: string;
    readonly description: string;
    readonly author: string;
}
You are almost done with the application. Navigate back to the ./src/books/books.module.ts file you created earlier and update it with the following code:
import { Module } from '@nestjs/common';
import { BooksController } from './books.controller';
import { BooksService } from './books.service';
@Module({
  controllers: [BooksController],
  providers: [BooksService]
})
export class BooksModule {}
Start the application again if it is not running at the moment with:
npm run start
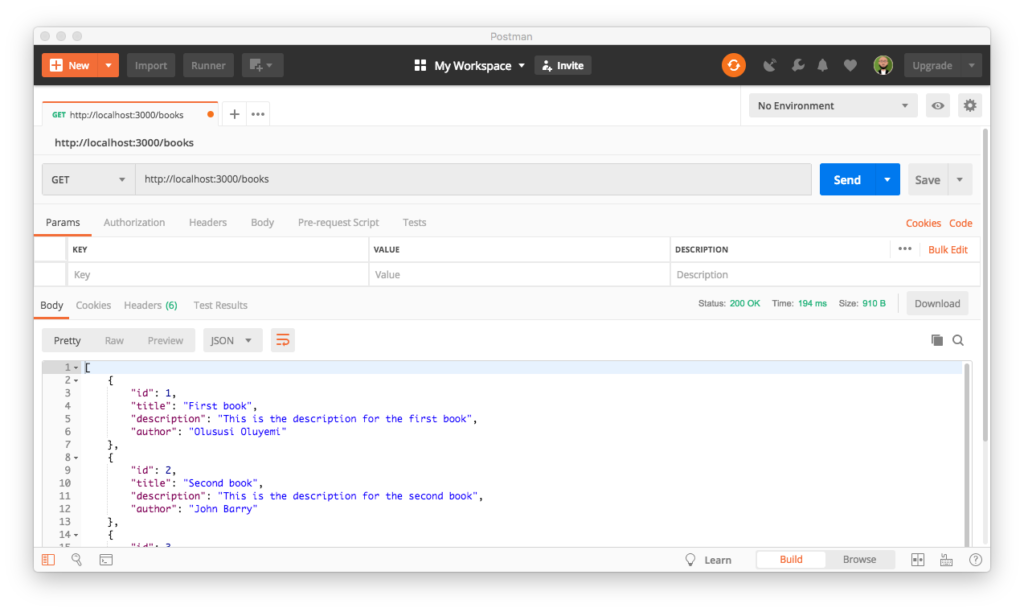
Then use postman to test the API:
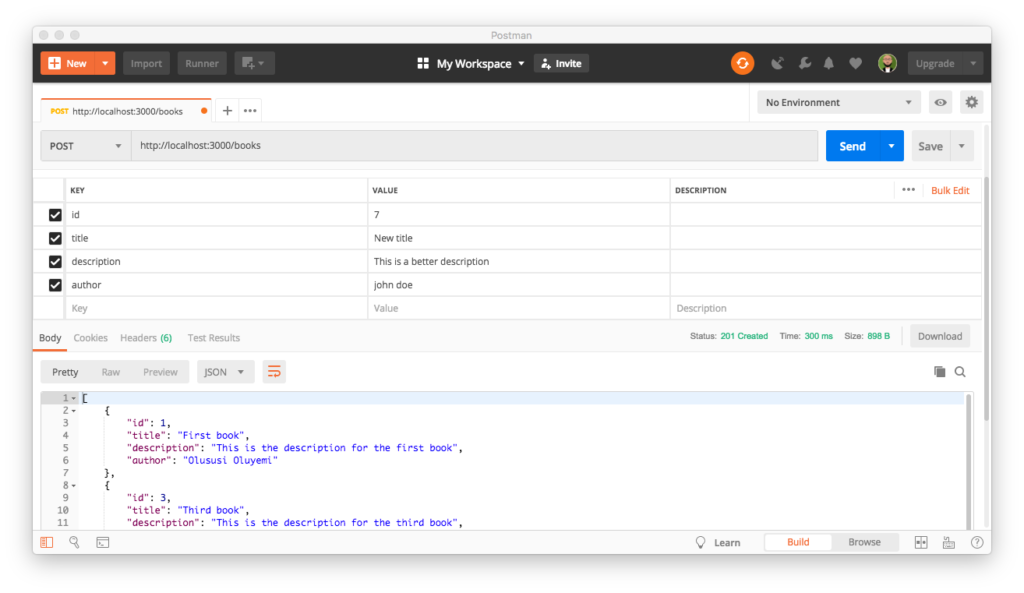
Create some new books:
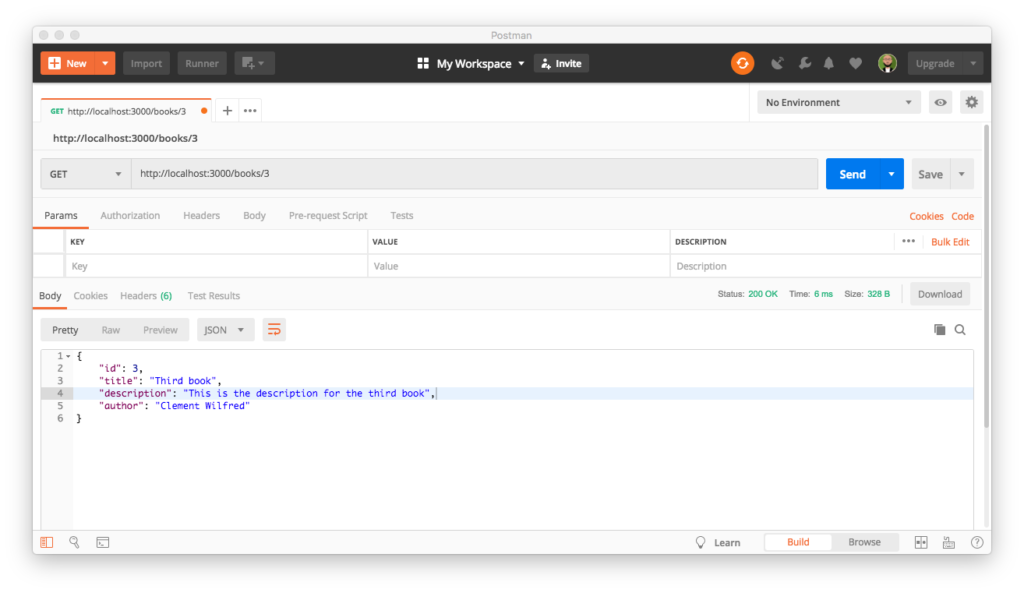
Get a book using an ID:
In this tutorial you took a quick look at the fundamentals and basic building blocks of Nest.js and then built a RESTful API.
You will find the complete source code of this tutorial here on GitHub.
As the most popular web platform, WordPress is already powering up over one-third of the entire website. Hundreds of people

As the most popular web platform, WordPress is already powering up over one-third of the entire website.
Hundreds of people are entering the community every day. If you too are one of them, we are welcoming you with this easy and beginner-friendly tutorial- “How to Install WordPress on Localhost” in five easy steps.
Learning WordPress is just fun. Nowadays, anyone can build a website for his/her blogging, business, or any other purpose within minutes. Yes, CMS (Content Management System) made it such easy for all of us. And WordPress is leading the CMS industry with a surprising market share of more than 64.2%!
In this post, we have shown how to install WordPress on localhost in 5 easy steps.
We have also added an a-z video tutorial at the end to make your journey easier! So, nothing to worry about.
Now, let’s start with this basic question.
A site in a localhost environment is basically for personal purposes, not for users or audiences. The only person who can see the site is you! So, why does anyone need to create a site in localhost?
The answer is already given in the above paragraph. Before going live with our site or making a visual presence, we should learn the basics and test the output of our developed solution. A localhost site lets us check and experience the updates, changes, settings, etc. to be sure about the final outputs.
Basically, developers use these sites to check their works for being sure about the quality and issues on it. But as a user, you too should create and use one or more localhost sites before making any update or adding a new feature.
So, a localhost site actually supports you to prepare for your next final move. Technology is going ahead rapidly so is the software industry. There is no chance to ignore the updating-upgrading process. Here comes the local host site to the rescue.
WordPress made it easy to install the solution with ease both in a c-panel or local host. Most of the famous hosting provider companies offer one-click installation for WordPress. But, you need to depend on a localhost webserver solution to create a database and save your files when you are creating a local site.
And there is a number of popular solution out there to set up your WordPress on Localhost. To make your job easy, we are mentioning four of the most popular localhost service providers.
In this post, we will show you how to install WordPress on localhost using XAMPP. This localhost server is famous for its overall support and quick response. You can install WordPress using WAMP, LAMP or MAMP, following the same way.
These are the software that creates localhost on your PC by utilizing web server software Apache, PHP, and MySQL. You may know-
PHP is a programming language and MySQL is a database management software. Both of them are required to run a WordPress site.
Installing each of this software separately is difficult and time-consuming for beginners. That’s why you need to depend on solutions like XAMPP/WAMP/LAMP/MAMP.
Among these solutions, XMAPP and WAMP are open-source and provide a free solution.
XAMPP is better than WAMP because it’s compatible with all the available operating systems like Windows, OS-X, and Linux. On the other hand, WAMP is limited only to the Windows operating system.
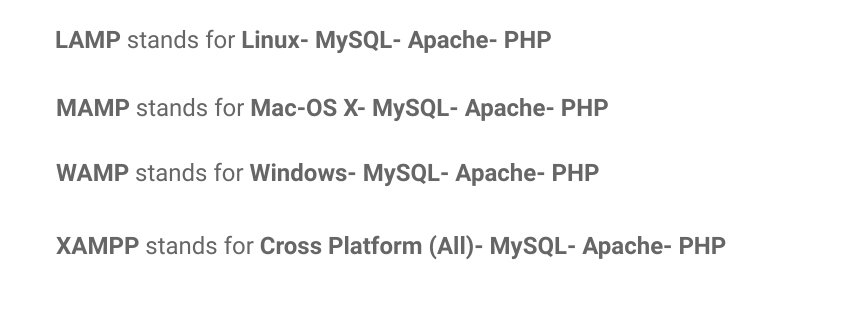
LAMP and MAMP are also open-source-based free localhost solutions and provide good support. But the problem is LAMP stands basically for Linux operating system and MAMP is limited only to Mac operating system.
And there are more localhost platforms like AMPPS.
So, which one is better compared to the others? You could find XAMPP as the best suite for any of the operating systems with its lots of features.
Now, let’s start with the first step.

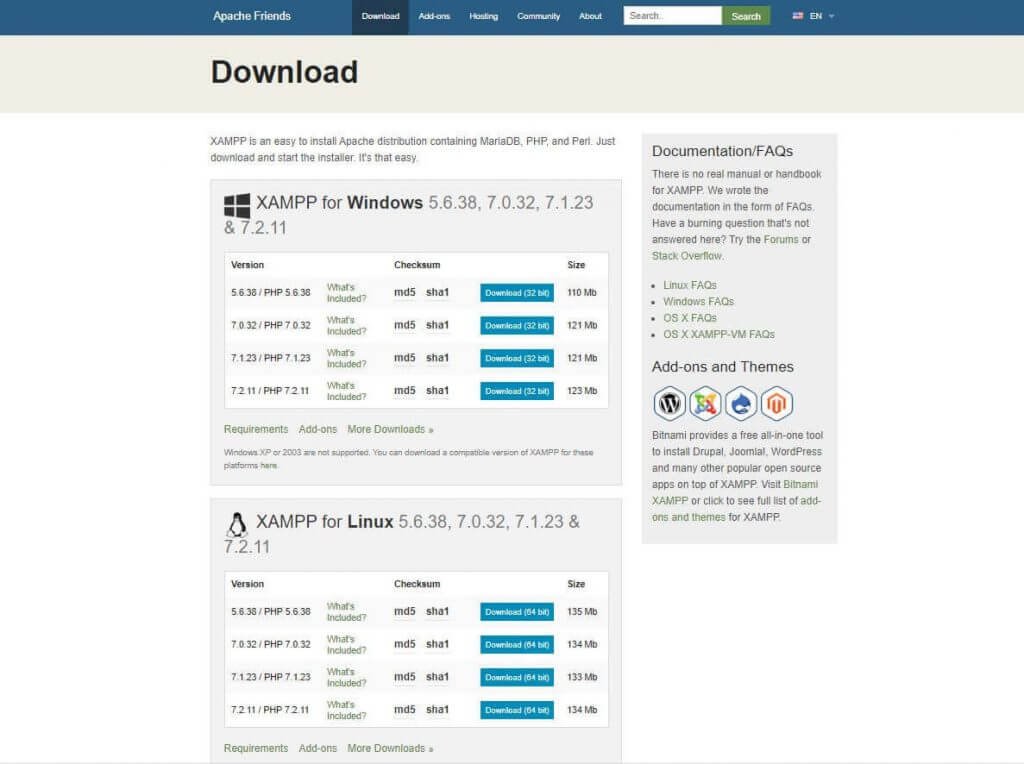
After clicking on the download button, wait for a few moments. It’s around 150 MB file, so you should give some time for it to get downloaded.
This is the second step. After downloading the software, you need to unzip it. When the file is ready, just select the Install button or click on it twice. Soon you will discover that the installation process has begun.
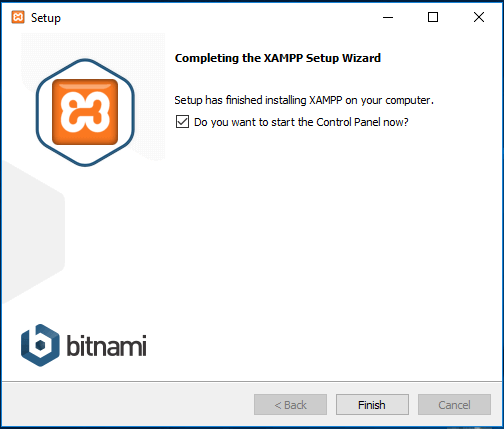
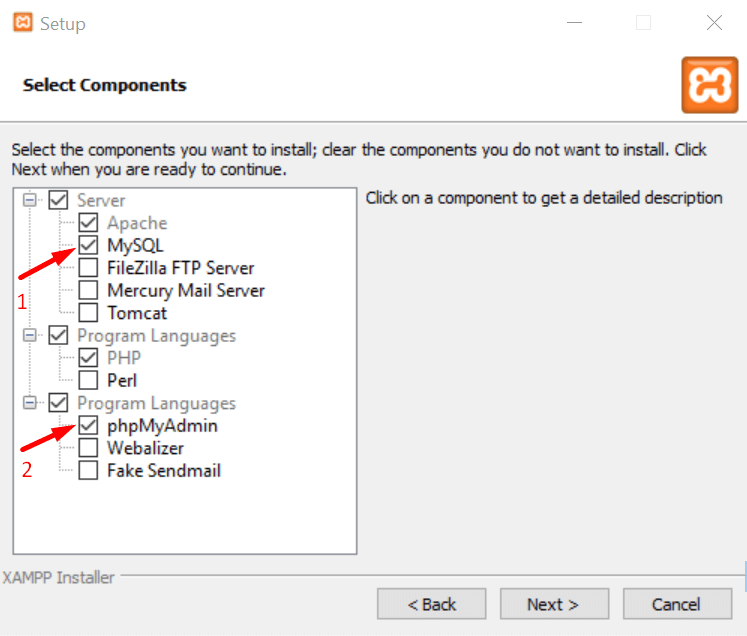
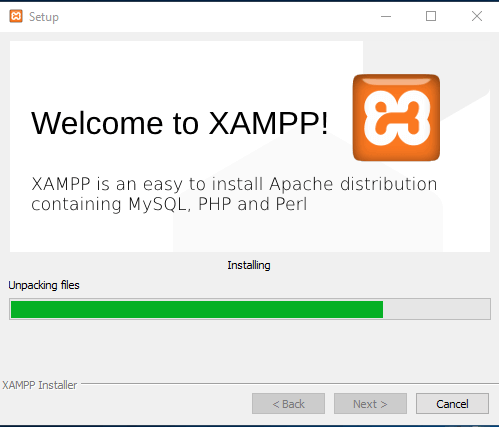

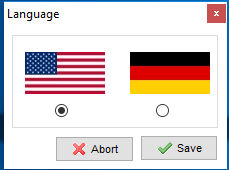

Congratulations! You have completed the XAMPP installation process!
Now is the time to create a database and start installing WordPress on localhost. To do that, you need to download the latest version of WordPress.
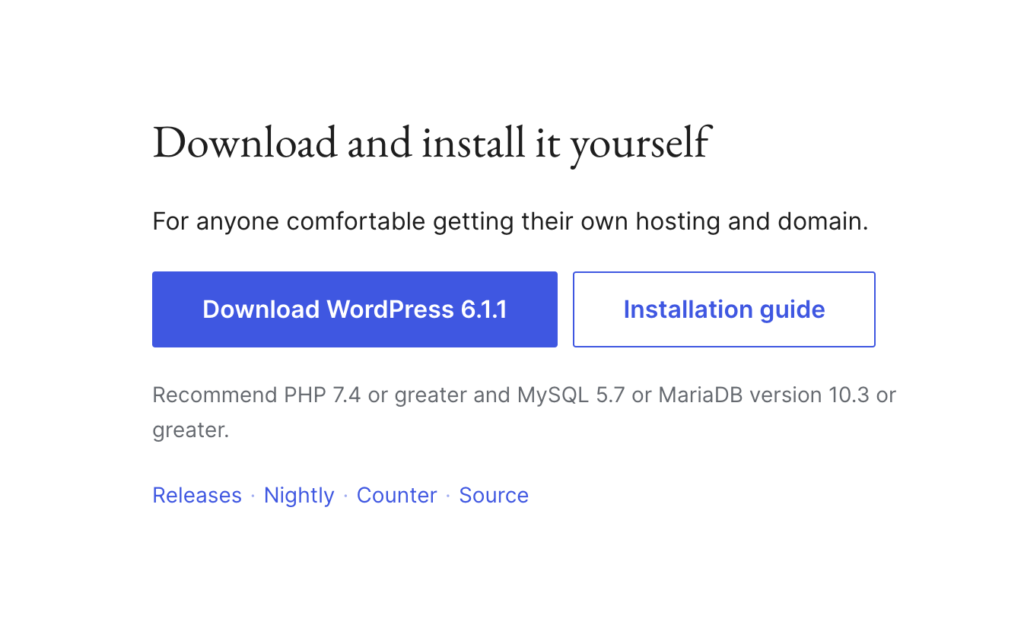
The download process might take a few moments to begin. You will get a zip file. Unzip the file and copy that for your next use.
To create a database, first, you need to prepare a folder on your PC in which you want to save all the data of your local site.
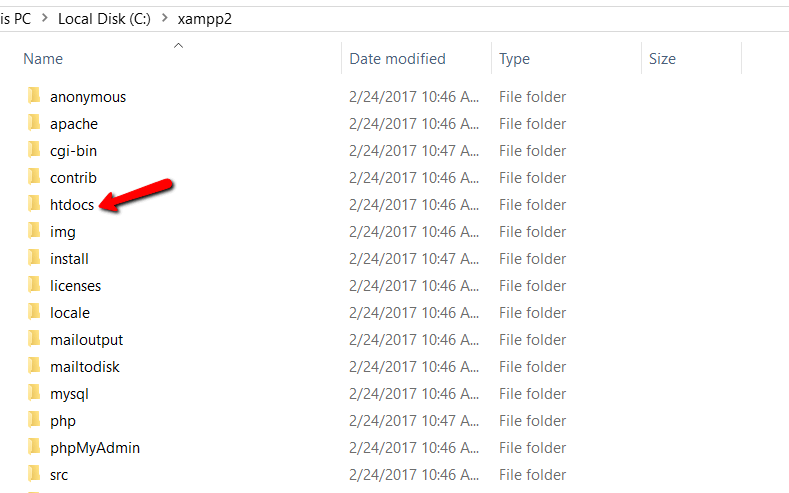
Now, rename the WordPress folder. You can avoid this option if you want to build your site with the name ‘WordPress’ itself.
We named the folder here ‘mytest’. Check the below screenshot. You should remember the name you have selected for your database.
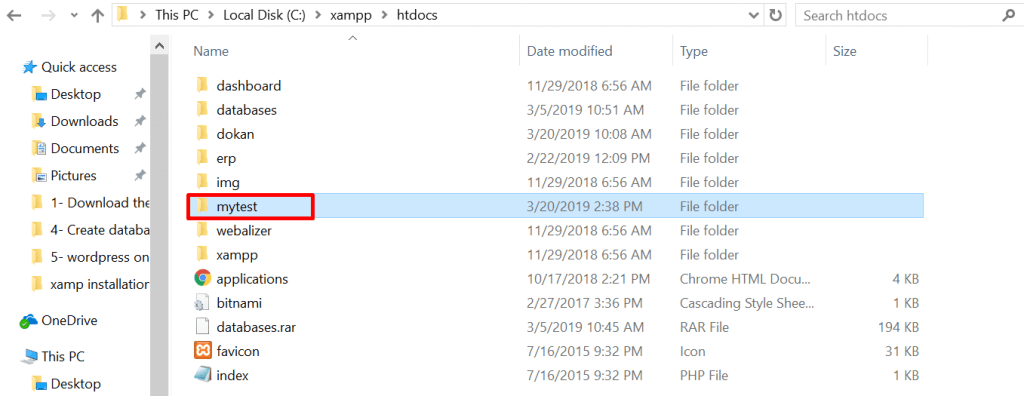

You have successfully created your localhost database. Now, is the turn to install WordPress on the localhost.
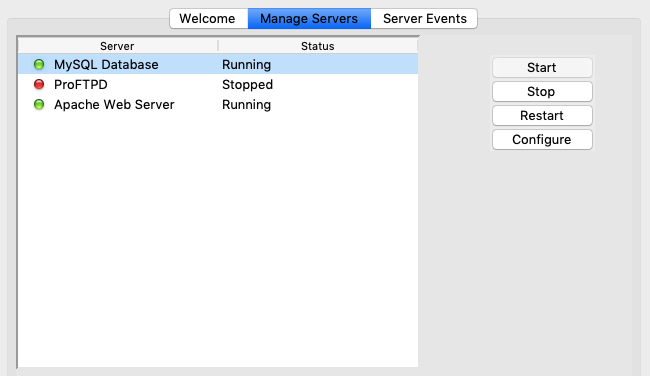
Note: Before going to the final step, you need to start both Apache Web Server and MySQL Database from the Xampp control panel installed on your PC or Mac. Without starting both of them, you can’t get access to PHPMyAdmin.
Just go to your app folder. Select the Xampp control panel and click on MySQL and Apache buttons. Have a look at below screenshot.
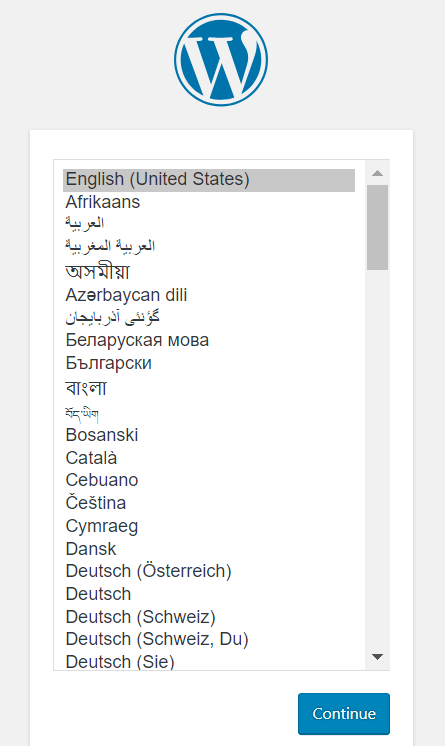
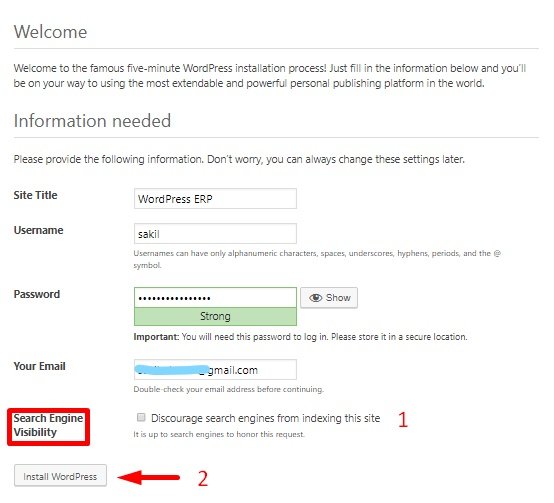
Open a new tab on your browser and write localhost/your given name (‘mytest‘ in our case) and hit on the Enter button. You will see a WordPress setup wizard like below.

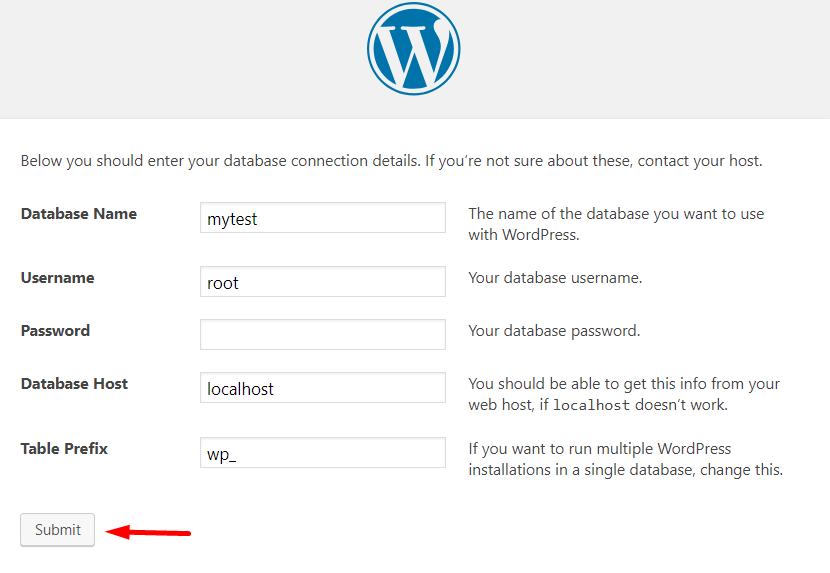
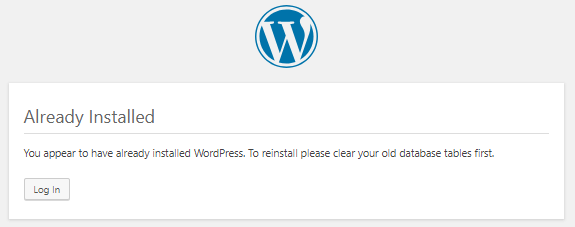
Yes, you have completed your installation. You should see a notice like below.
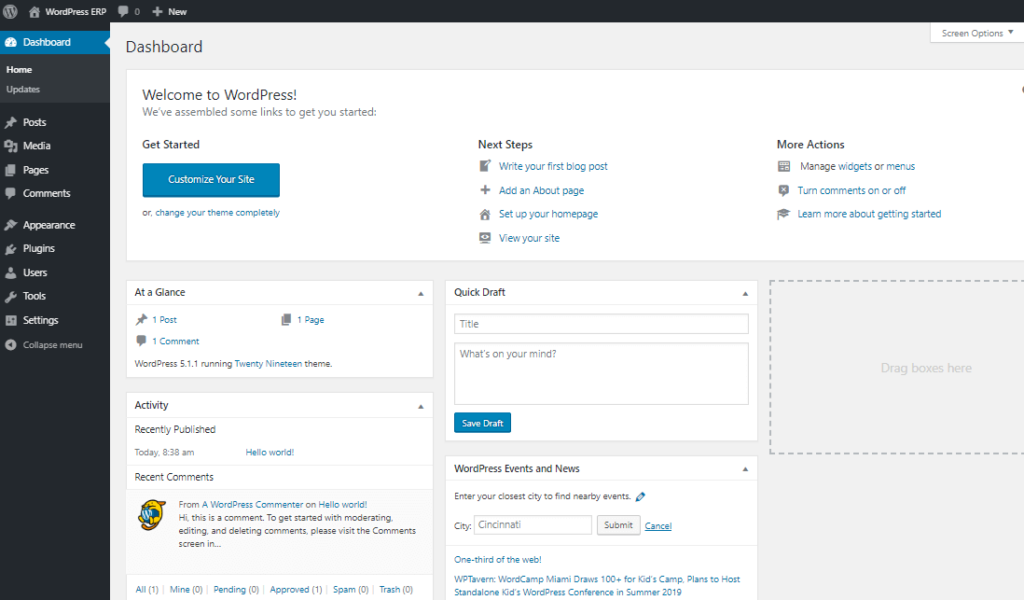
This is the time to check out your local site. How would it look like or how would it work? Give a check.


So, this was the total process of building a personal testing site in a localhost environment. The process requires 5-10 minutes based on your capability.
As CMS made it easy to build a website for people of any background, you can consider it as fun. Yes, building a website with WordPress is so easy these days. You already know- how to install WordPress on the localhost, so it’s your turn to build a site for learning WordPress or checking/testing any plugin/theme/update, etc.
WordPress started its journey just as a blogging platform, but over time it became the most powerful web platform for all sorts of websites. You can easily build an online shop or even a multi-vendor marketplace completely free of cost!
So, give it a try and let us know in the comment section below if there is any confusion. We are always here to help!
First of all, let’s start with the definition of a software architect. In other posts that I’ve written which are

First of all, let’s start with the definition of a software architect. In other posts that I’ve written which are similar to this, I’ve found it useful to start off with the definition.
According to Wikipedia:
A software architect is a computer programmer or expert who makes high-level design choices and dictates technical standards, including software coding standards, tools, and platforms.
So, as part of this role, you need to make design choices. You also need to be pretty knowledgeable about computer programming. Let’s have a look at some of the steps you need to take to become a software architect.
In the past six years, I have worked with PHP, then moved to JavaScript, and became a team lead. I managed various developer teams, including PHP, Node.js, and other Web technologies. Created the architecture of the network layer for several services developed by the company, with sockets and REST API. I became acquainted with the managerial role and the prospect of growing in this direction while in the position of team lead for over two years. In my next role, my goal is to grow as a software architect.
For most developers, the function of the architect on the project is often unclear, so in this article, I will try to find the answers to these related questions. Who is an architect, what is the scope of responsibilities, and how to grow in this direction and outline an action plan for myself and beginners wanting to move along this path?
This article will help you if you belong to one of the following categories:
● IT developer or engineer. You are still growing as a developer, but you are looking ahead and planning your career. Even if the goals are initially vague, a person who consciously sets strategic goals will reach them much quicker than a person who does not plan where she is heading.
● Team leader, lead software engineer. You are at the highest stage of the software development discipline. To grow further, you have a choice to either learn one more stack of technologies, pursue a career outside software engineering, or become a software architect.
● Software architect. You recently took this position, or have been working in this field for a long time. Perhaps one of the main qualities of such a specialist is the understanding that there are always areas that a person does not know and that the learning process is continuous.
● IT manager. Although you are a manager, you understand perfectly well that you should at least approximately understand what your subordinates or colleagues are doing. The acute problem of management is the technical incompetence of the manager in the field in which he or she is managing.
Before moving on to more specific questions, it is necessary to define the software architect’s role and responsibilities.
A software architect is a software expert who makes high-level design choices and dictates technical standards, including software coding standards, tools, and platforms. The leading expert is referred to as the chief architect. (Wikipedia, The Free Encyclopedia, s.v. “Software architect”, https://en.wikipedia.org/wiki/Software_architect
Like most high-level positions, there are no clear criteria that define this role. However, it is possible to identify several responsibilities and qualities that contribute to the career of an architect.
First, let’s consider the characteristics of the architect:
● Communicability. Having talked with many software architects, I heard that it is one of the essential characteristics of this specialist. During the working day, they have to speak with customers in the language of business, managers of all levels, business analysts, and developers. If you have a natural charisma and you know how to convince people, then this will be a huge plus, as it is crucial to explain your actions correctly. Architects are laconic, eloquent, and competent speakers. The software architects with whom I spoke have highly developed skills in communication and persuasion. Another reason why this characteristic is most important is that the architect in this role participates in most discussion-making processes, and often compromises must be reached that are acceptable and beneficial for all involved parties.
● Broad and deep technical knowledge. It should be obvious since one cannot become a software architect with a medical background. Besides, the architect usually has expertise in several technological stacks at a decent level and should have a good understanding of a few other ones. The software architect should also be prepared to compose a large number of technical documentation, reports, and diagrams.
● Responsibility. You should understand that architect decision are usually the most expensive. Therefore, a person in this position should take the most responsible approach to his work and the decisions made. If the developer’s error costs a couple of days of work of one person, then the architect’s mistake can cost person-years on complex projects!
● Stress resistance. You will have to make decisions because in this role, you will be asked to do so, and you will need a response. You will be working with different people from different areas, and you will have to deal with rapidly changing demands or even with changing business environments. Therefore, it is necessary to be ready for stress and to look for some ways to escape negative emotions. Work is always more pleasant when it brings pleasure. So if you choose this role only for the money, then think again.
● Management skills. This includes both organizational and leadership skills. The ability to lead a team, which may be distributed and composed of very different specialists, is essential.
● Analytic skills. Even if a specialist has a broad erudition in technology, he has tried many things on his own or participated in projects of various types. It does not guarantee that he can easily change his style of thinking to an architect. One of the most valuable tasks is the ability to represent an abstract problem in the form of some finite real object of the system, which developers are already evaluating, designing, and developing. Excellent communication skills are essential to represent the abstraction in the form of the final system to the members of the team and the customer. It will be necessary to communicate with both business and development, which is still to be done.
If we talk about the responsibilities of the architect, then here is the perfect example from the 19th century about bridge construction. At that time, the tests of the newly constructed bridge were the following: the key group of engineers, architects, and workers stood under the bridge while the first vehicles were on it. Thus, they staked their lives upon the construction and the strength of the structure. So if there is a question — what is the responsibility of the software architect on the project? The answer is, he is responsible for everything.
If you give up loud and beautiful phrases, then the architect’s work includes:
● Identifying the stakeholders on the project.
● Identifying business requirements and requirements of the stakeholders on the project.
● Designing the entire system based on the received requirements.
● Choosing the system architecture and each component of this system at a high level.
● Choosing the technologies for the implementation of each component and connections between the parts.
● Architectural review. Yes, yes, it exists.
● Code-review.
● Writing project documentation and supporting it.
● Creating unified development standards in the company.
● Controlling the architecture during the next iteration of the system release.
It is only a subset of the software architect’s responsibilities. The most important responsibility is full technical support of the project from the moment of inception, through product release, to the development of enhancements. And supporting the next releases. It will be necessary to switch a lot between different tasks during the working day.
To begin with, it is requisite to define milestone goals that lead to achieving your strategic goal of becoming a software architect. For me, such goals for the next six months are:
● Understand and try several technological stacks. My current knowledge is concentrated in the field of iOS. It is necessary to try Android, several server languages, to start python, and refresh Java EE skills. The architect is a full-stack developer, so it is essential to have broad technical knowledge.
● Reading literature. It is required to determine the most valuable books and articles that will help to grow in this direction. Usually, the most effective way to find such literature is to ask other professionals in this field for their recommendations. In one of the future articles, I plan to give you such a list of literature.
● Find a mentor. It is desirable to find a software architect at your current place of employment. It is always easier to get experience from a trained specialist than to start considering a particular area from scratch. It is requisite to be prepared to ask the right questions from your mentor.
● Study courses/obtain certificates. There are many courses and certifications available, but only a few are worth their money and the higher-level courses cost a lot of money. I have attended the architectural courses in internal certification of my company. It is crucial that the lecturer of the course be a professional in this field and be able to answer questions. As for certificates, before starting, it is best to understand whether there are authoritative certification systems for architects and whether it is worthwhile obtaining the certification.
One of the essential parts is a clear and stable plan review. What has been done, what should be reviewed, and where to accelerate or which goal to remove as useless.
If you are interested in this introductory article from the series on how to become a software architect, or if you suddenly have thoughts to try this path, it is worth making sure that you want it.
Firstly, people are afraid of everything new. A new position, a new kind of stress, as opposed to the comfortable status quo. Of course, the choice is not always unambiguous and depends on how much you are willing to change something in your life. At the same time, it can depend not only on you but also on the family, your financial commitments, parents, and other factors.
Secondly, this path takes several years. The process of becoming a software architect does not happen overnight. As a team lead, I realized what to do and how to deal with stress only a year after I was appointed to an official position. At the same time, six months before that, I performed it unofficially. One software architect I know said that he understood what his responsibilities are 18 months after he was promoted to this role. Such intervals of time are reasonable, and you need to know whether you are ready to move in this direction. Even if you do not have a stable plan available, it is better to start taking small steps that move you ahead, rather than remaining in the same place.
Standing in the same place in IT is a synonym for stagnation and personal fetters in life.

I am available for freelance work. Connect with me via phone or email for discussion.
Phone: +91-7737121955 Email: hello@monumehta.com